
Wiring
Pick the voicing you're building and you'll get its bench-side wiring reference: the selector map, connection points, and the published harness.
Relay Reef has two branches. A 3-way blade selects the neck lipstick, both lipsticks, or the middle lipstick, and feeds the lipstick volume. The GFS Vintage ’59 bridge humbucker feeds its own volume and never passes through the blade. Both volumes are B1M (1 MΩ linear), wired so that turning one down silences only its own branch. The two branches join at BUS, which goes straight to the output jack. There is no tone control and no treble bleed.
Open full size
Download PNG
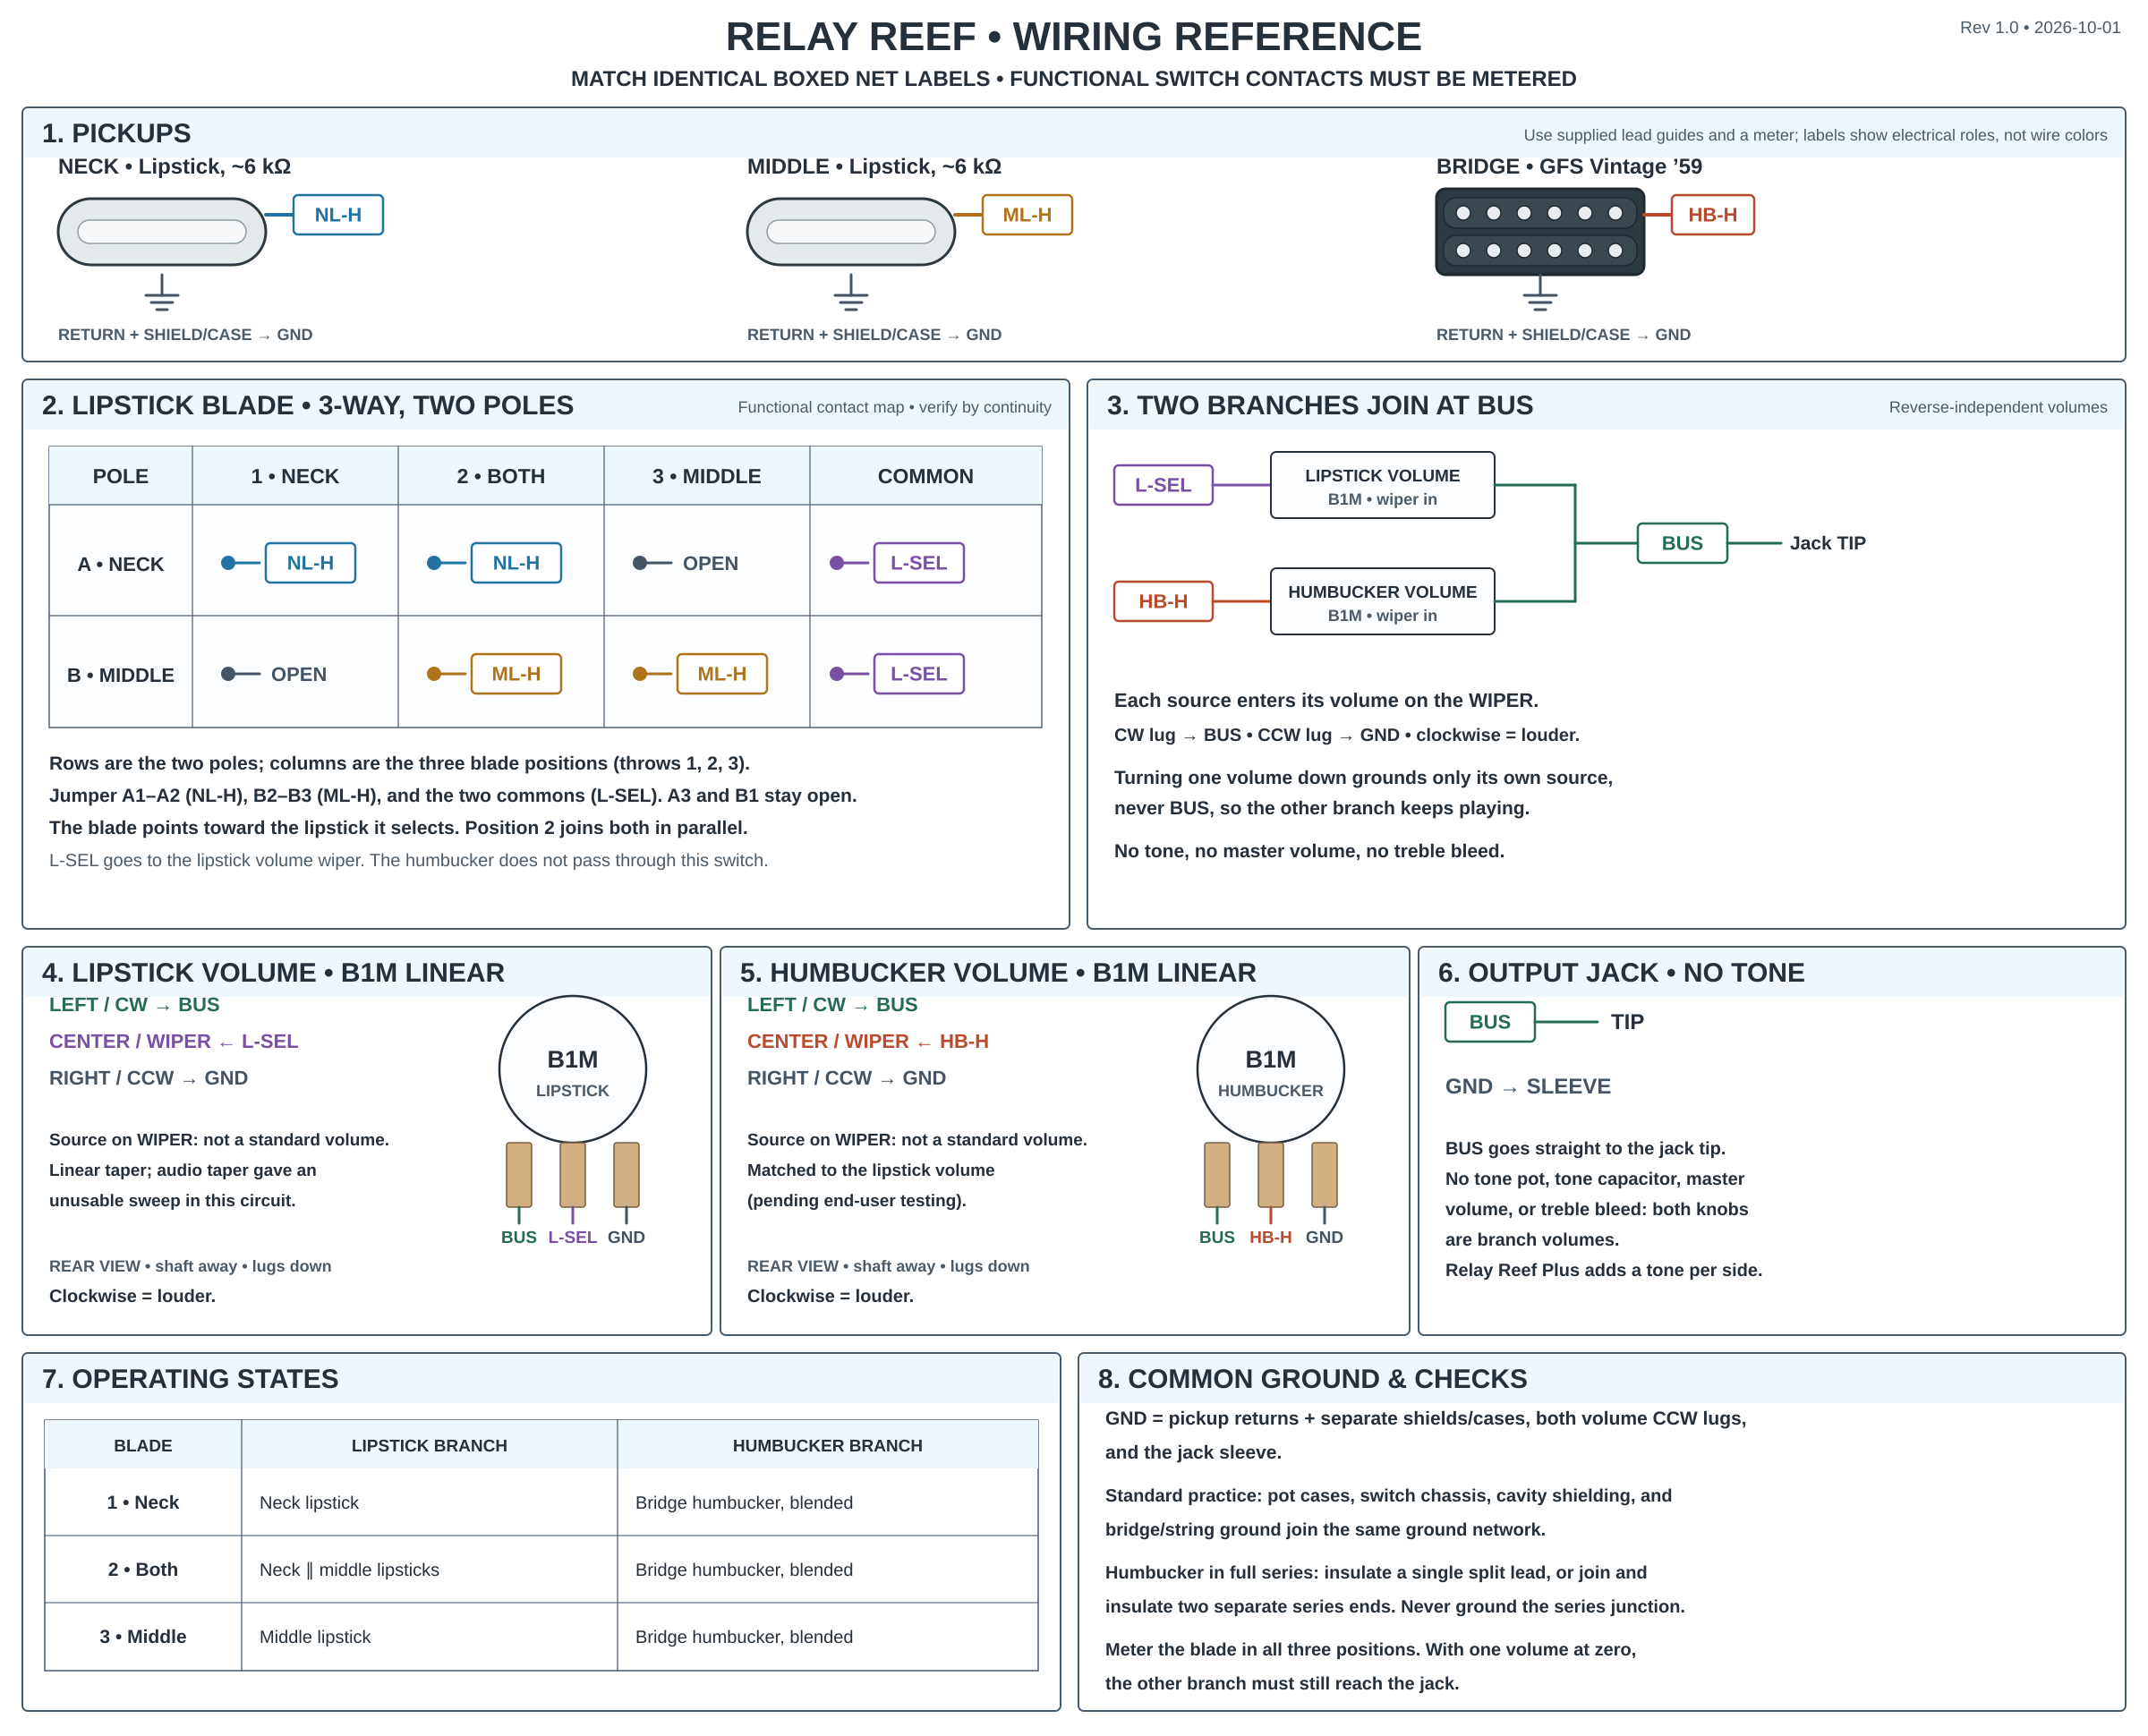
The 3-way blade is shown as a functional contact map, not the physical lug layout of a particular switch. Identify the contacts on the parts in hand with a continuity meter. The diagram's colored paths show circuit roles, not guaranteed GFS lead colors.
What each switch position does
| 3-way blade | Lipstick branch | Humbucker branch |
|---|---|---|
| 1 — Neck | Neck lipstick | Bridge humbucker, blended by its own volume |
| 2 — Both | Neck + middle lipsticks in parallel | Bridge humbucker, blended by its own volume |
| 3 — Middle | Middle lipstick | Bridge humbucker, blended by its own volume |
The blade points toward the lipstick it selects. The humbucker is available in every position; set its volume to zero to hear the lipsticks alone, or set the lipstick volume to zero to hear the humbucker alone.
Parts and lead identification
- Bridge: GFS Vintage ’59 humbucker, wired full series.
- Middle and neck: GFS Pro Tube lipsticks, around 6 kΩ each, with hot, return, and shield or case ground as supplied.
- Controls: Two-pole 3-way blade (vintage Fender style, eight lugs), two B1M (1 MΩ linear) volumes, and a mono output jack. No tone pot or tone capacitor.
Use the supplied guide for each pickup's actual lead version and confirm with a meter; wire colors are not interchangeable across pickup models. On the humbucker, insulate an unused single split lead, or join and insulate the two separate series ends when the pickup supplies those instead. Never ground the series junction. Keep a separate case or shield lead grounded.
Both volumes must be 1 MΩ linear and the same value. Audio-taper pots give an uneven sweep with a sudden drop near the top in this circuit.
Blade contacts
Each pole connects its common to one throw per position: throw 1 in position 1, throw 2 in position 2, throw 3 in position 3. The two lipstick hots use separate poles, so they never share a contact.
| Pole | Common | Throw 1 | Throw 2 | Throw 3 |
|---|---|---|---|---|
| A — Neck | AC = L-SEL | A1 = NL-H | A2 = NL-H | A3 (unused) |
| B — Middle | BC = L-SEL | B1 (unused) | B2 = ML-H | B3 = ML-H |
Connection map
Match the boxed labels in the diagram. Every GND symbol belongs to one common ground network.
| Node | Connect these points |
|---|---|
NL-H | Neck lipstick hot to blade A1; jumper A1 to A2. |
ML-H | Middle lipstick hot to blade B2; jumper B2 to B3. |
L-SEL | Blade AC jumpered to BC, then to the lipstick volume wiper. |
HB-H | Bridge humbucker hot to the humbucker volume wiper. It does not go through the blade. |
BUS | Lipstick volume CW lug ↔ humbucker volume CW lug ↔ output-jack tip. |
| Unconnected | Leave blade A3 and B1 open, connected to nothing. Insulate the humbucker series junction; never ground it. |
GND | Pickup returns and separate shields/cases, both volume CCW lugs, pot cases, conductive blade chassis, cavity shield, bridge/string ground, and jack sleeve. |
Pot orientation: In the rear view with shafts pointing away and solder lugs down, the physical left/center/right terminals are CW/wiper/CCW. The lipstick volume's left/center/right lugs are BUS/L-SEL/GND. The humbucker volume's are BUS/HB-H/GND. This is not a standard volume: the source goes to the wiper and the output comes from the CW lug. Both knobs get louder when turned clockwise.
Build outline
- Shield the cavity first.
- Identify the pickup leads and the actual blade contacts by continuity in all three positions.
- Build the harness on the bench: lipsticks to the blade with the two jumpers, the joined commons to the lipstick volume wiper, the humbucker hot to the humbucker volume wiper, and both CW lugs to
BUSand the jack tip. Insulate the humbucker series junction and the unused blade throws. - Run one clean ground scheme: tie shielding, pickup returns and shields, pot cases, both volume CCW lugs, and the jack sleeve into one ground network.
- Install the harness only after it passes the meter check and tap test.
Bench checks
- Meter the blade:
L-SELmust reach onlyNL-Hin position 1, bothNL-HandML-Hin position 2, and onlyML-Hin position 3. In positions 1 and 3,NL-HandML-Hmust not connect; in position 2 they join only throughL-SEL. - With the lipstick volume full up and the humbucker volume at zero, measure between jack tip and sleeve. Expect roughly 6 kΩ in positions 1 and 3 and roughly 3 kΩ in position 2. Measure the isolated lipsticks rather than treating these readings as pass/fail limits.
- With the humbucker volume full up and the lipstick volume at zero, expect roughly the humbucker's own resistance.
- With both volumes at zero, the tip does not reach ground: expect roughly 500 kΩ, the two 1 MΩ tracks in parallel. A short to ground here means a source is on an outer lug instead of the wiper.
- Tap-test each pickup at low amplifier volume. Turn each volume from stop to stop with the other full up: the other branch must keep playing at zero.