
Fuzz Face Kit Assembly Guide
This kit hasn't been released yet. The instructions are complete, but some values are estimates that will be replaced with measurements from the prototype build.
Assembly Procedure
Prepare your workspace
Find a clean, well-lit area to work. Collect your kit components and tools. You will need the following:
- Soldering iron
- Flux-core solder
- Small wire cutters and wire strippers
- Multimeter (required: you use it to cut tracks, check the board, and set the bias)
- A 3 mm (1/8 in) drill bit or a stripboard track cutter
- Small flat screwdriver for the trimmer
- Heat gun or lighter for heat-shrink tubing
- Needle-nose pliers (optional)
- Helping hands, or similar device, to hold parts while soldering
Inventory the parts
Open your project bag and verify that all the components are there. You will have the following:
Count Item Marking or value 1 Stripboard, 20 × 8 holes 2 Transistors, Q1 and Q2 2N3904 1 Resistor, R1 1 MΩ (brown, black, green) 1 Resistor, R2 22 kΩ (red, red, orange) 1 Resistor, R3 10 kΩ (brown, black, orange) 1 Resistor, R4 (small size) 100 kΩ (brown, black, yellow) 1 Resistor, R5 1 kΩ (brown, black, red) 1 Resistor, R6 2.2 kΩ (red, red, red) 1 Resistor, R7 (LED) 4.7 kΩ (yellow, violet, red) 1 Trimmer, VR1 50 kΩ (503) 2 Film capacitors, C1 and C3 470 nF (474), 10 nF (103) 1 Electrolytic capacitor, C2 22 µF 2 Ceramic capacitors, C4 and C5 100 nF (104), 47 pF (470) 2 Potentiometers B1k (FUZZ), A500k (VOLUME) 1 3PDT footswitch 1 LED and bezel 2 1/4 in jacks stereo (input), mono (output) 1 9 V battery snap — Hookup wire, link wire, heat-shrink tubing If anything in your kit is missing or damaged, please contact me at de.k7rhy@gmail.com. I will send you a replacement part.
Sourcing your own parts instead? See Sourcing your own parts for the specifications.
Learn the board
Stripboard has copper strips running along its length. Every hole in a strip is connected, so the strips do the wiring for you. You break a strip where two parts must not connect.
Holes are named by row and column, like a map. Rows run A to H from top to bottom, and columns run 1 to 20 from left to right, with the parts on top and the copper underneath. For example, D10 is row D, column 10. Keep the layout diagram open while you work. Select it to open the full-size image.
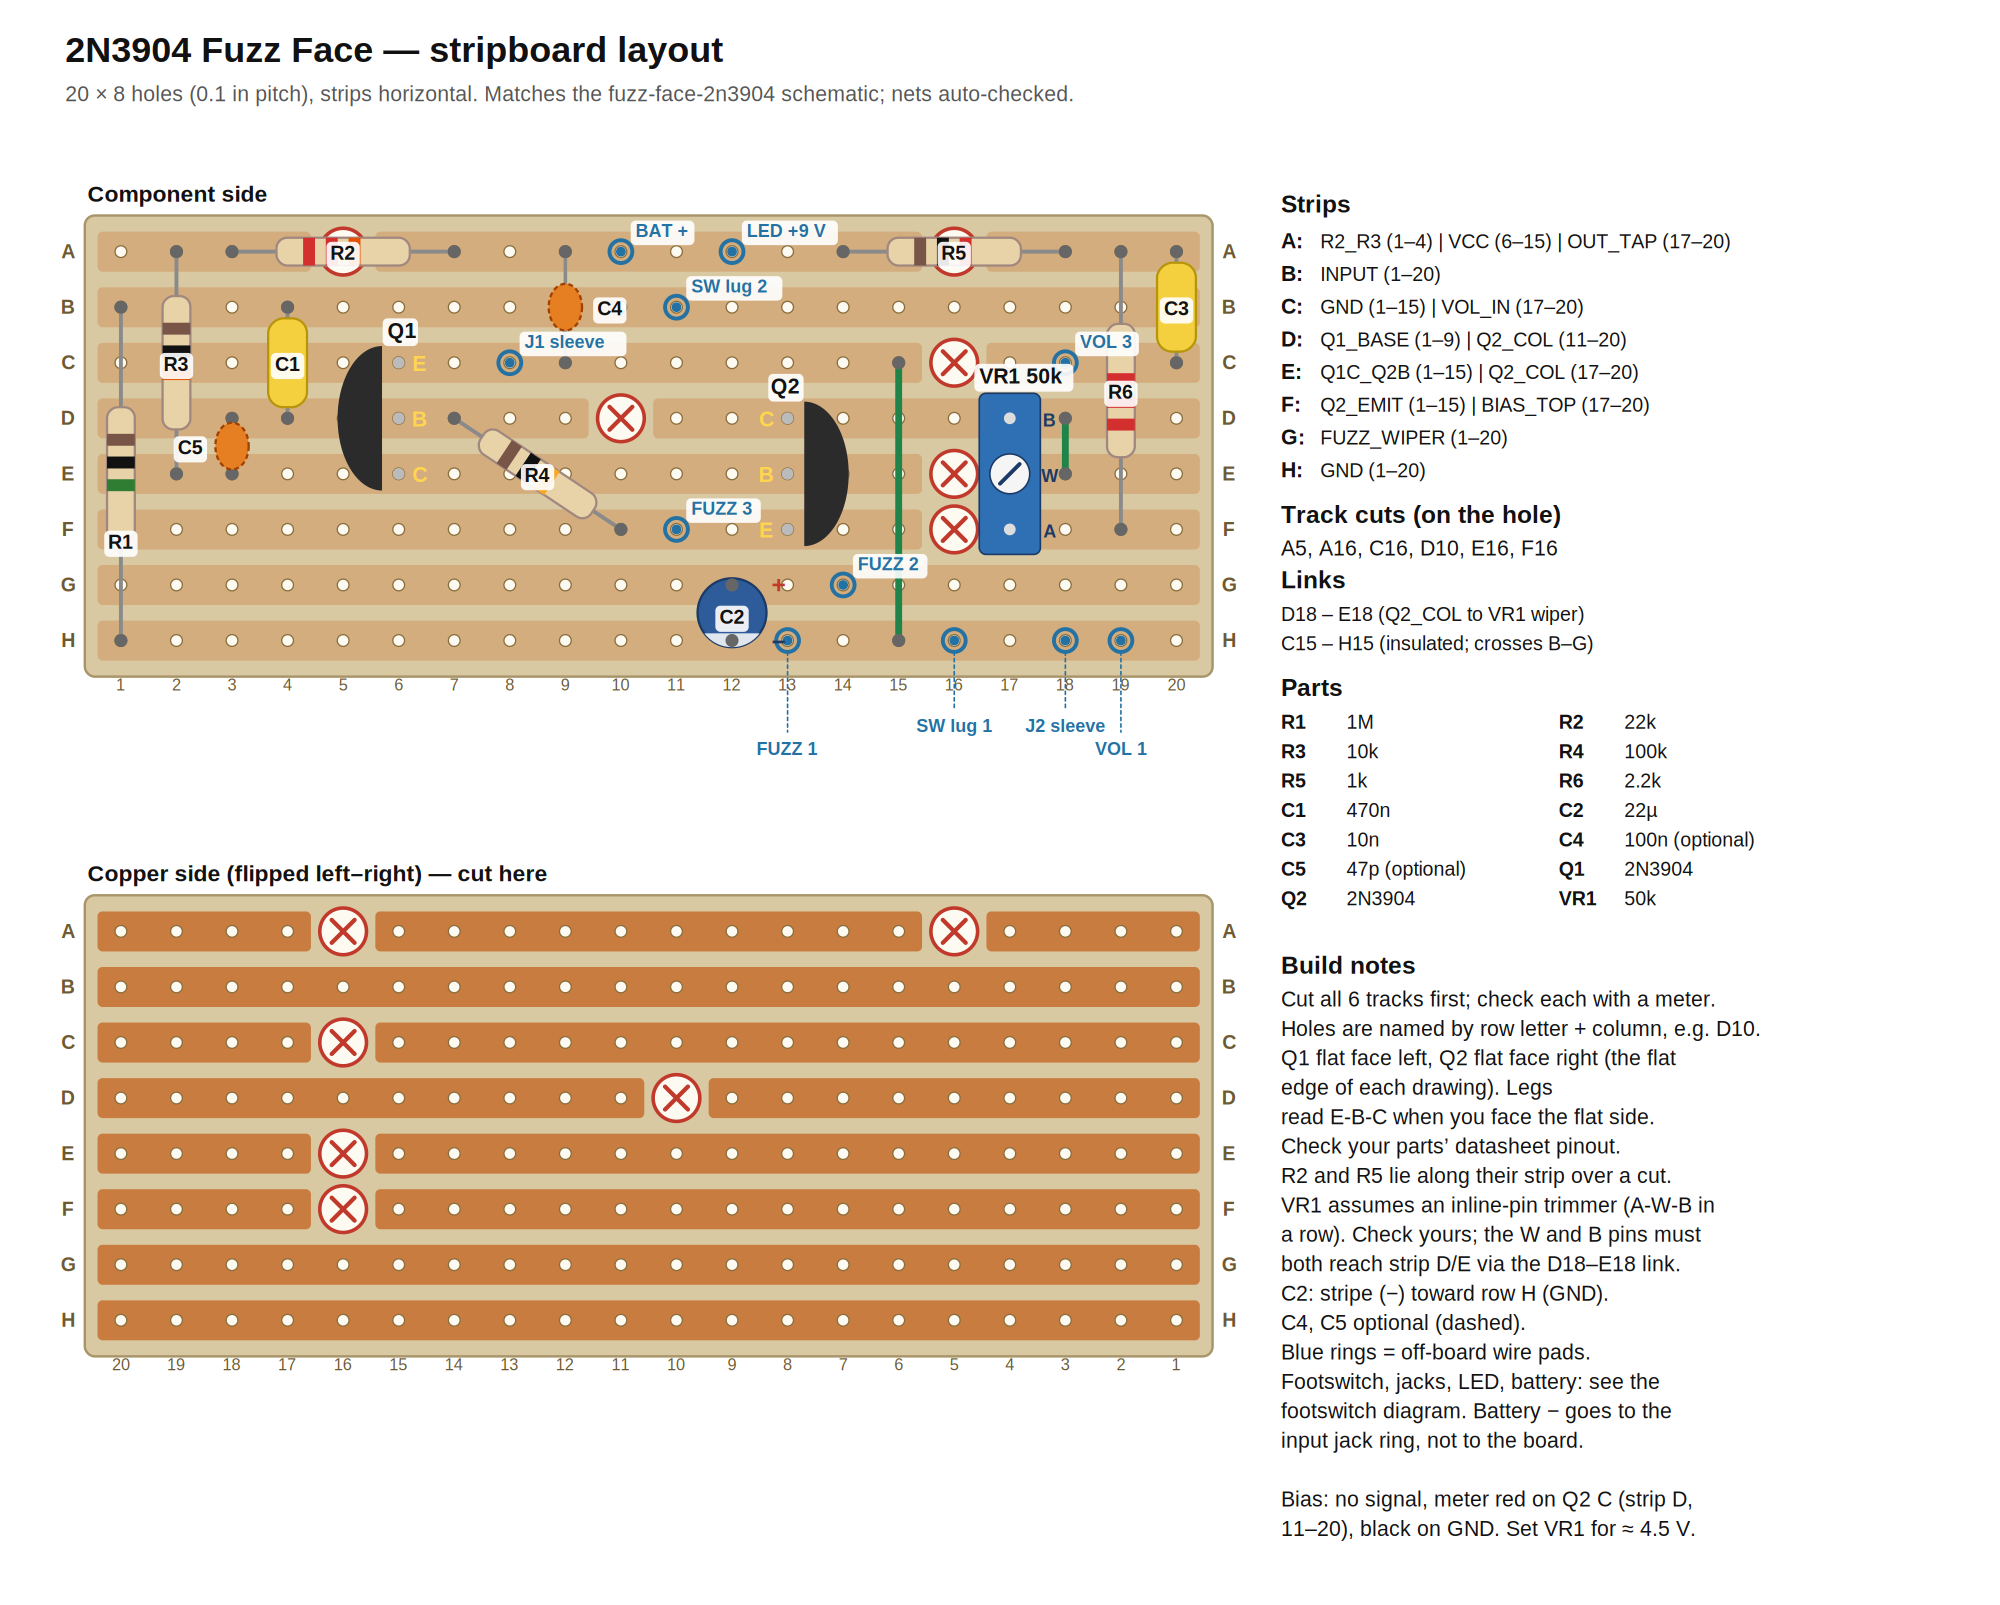 ImportantThe copper side is a mirror image
When you flip the board over to cut or solder, left and right swap. Column 1 is now on your right. The layout's copper-side view is already flipped for you, so use that view whenever the copper is facing up.
Cut the tracks
Six holes need their copper cut: A5, A16, C16, D10, E16, and F16. Cut the tracks before you install any parts.
Mark the cuts
With the copper side up, find each cut on the copper-side view and mark it with a fine marker. Count columns from the right-hand edge, because the board is flipped.
Cut each hole
Place the drill bit in the marked hole and twist it by hand, with light pressure, until the copper ring around the hole is gone. You only need to cut through the copper, not through the board.
Check every cut
Set your multimeter to continuity. For each cut, touch the probes to the holes on either side of it. It must not beep. If it beeps, a thin sliver of copper remains: twist the bit again, or scrape the gap with a hobby knife.
Install the wire links
Links are short wires that connect two strips.
- D18 to E18: bare wire is fine.
- C15 to H15: use insulated wire. It crosses strips D through G, and it must not touch them.
Solder both ends and trim the excess on the copper side.
Install the resistors
Resistors are not polarized, so either direction is fine. Install them in the order below, from the flattest part to the tallest. For each one, bend the leads to fit the holes, push the resistor flat against the board, bend the leads outward on the copper side to hold it, solder, and trim.
Resistor Value Holes R2 22 kΩ A3 to A7 R5 1 kΩ A14 to A18 R3 10 kΩ A2 to E2 R1 1 MΩ B1 to H1 R6 2.2 kΩ A19 to F19 R4 100 kΩ D7 to F10 (diagonal; the small resistor) NoteWhy R2 and R5 lie along a stripR2 and R5 each sit along strip A, over one of the cuts you made. The cut underneath splits the strip, so each resistor connects the two pieces. That saves a row on the board.
The colors in the parts table are the 4-band codes. If your resistors have five bands, they're 1% parts with an extra digit band. Either way, use your multimeter to check each value before you solder it, because color bands are easy to misread.
Install the capacitors
Install the film capacitors
Install C1 (470 nF) from B4 to D4, and C3 (10 nF) from A20 to C20. Film capacitors are not polarized.
Install the ceramic capacitors
Install C4 (100 nF) from A9 to C9. C4 filters the battery supply.
Your ChoiceUnderstanding Your Options - C5Leave C5 (47 pF, D3 to E3) out for now. High-gain silicon fuzz circuits sometimes squeal or pick up radio stations, and C5 cures that, but it costs treble, gain, and volume. Q1 multiplies its effect, so even a small value acts like a much larger capacitor at the input. On the prototype, a 100 pF C5 made the pedal sound muffled and quiet, and the FUZZ knob barely changed anything. Without C5 it didn't squeal. Test the pedal first, and install C5 only if you hear squealing or radio.
Install the electrolytic capacitor
C2 (22 µF) is polarized. The stripe on its side marks the negative (−) lead, which is also the shorter lead. Put the negative lead in H12 and the positive lead in G12.
CautionCheck C2's directionAn electrolytic capacitor installed backwards can fail and leak. Check the stripe before you solder.
Set and install the trimmer
VR1 sets the bias, which is the most important adjustment in a Fuzz Face. Set it roughly before you install it, so the pedal works the first time you power it up.
Preset the trimmer
Measure the resistance between the trimmer's outer pin A and its middle pin W (the wiper). Turn the screw until it reads about 3.5 kΩ.
Install the trimmer
Install VR1 with pin B in D17, the wiper W in E17, and pin A in F17. The D18 to E18 link you already installed connects the wiper to pin B.
Install the transistors
Install the transistors last, because they are the most heat-sensitive parts. Work quickly: about 2 seconds per joint, and let the part cool between joints.
Both transistors have a flat face. When you look at the flat face with the leads pointing down, the leads are E, B, and C from left to right.
Transistor Flat face points Holes Q1 Left (toward column 1) E in C6, B in D6, C in E6 Q2 Right (toward column 20) C in D13, B in E13, E in F13 CautionQ1 and Q2 face opposite waysThis is on purpose, so both transistors can share strip E. Installing a transistor backwards is the most common mistake in this build, so match each one to the layout diagram before you solder.
Attach the off-board wires
Solder a wire into each pad below from the component side, long enough to reach its part in the case. Leave some slack.
Pad Goes to Suggested color A10 Battery snap + Red A12 R7 at the LED Red B11 Footswitch lug 2 Green C8 Input jack sleeve Black C18 VOLUME lug 3 Blue F11 FUZZ lug 3 Orange G14 FUZZ lug 2 Blue H13 FUZZ lug 1 Black H16 Footswitch lug 1 Black H18 Output jack sleeve Black H19 VOLUME lug 1 Black Pot lugs are numbered 1, 2, 3 from left to right when you look at the back of the pot with its lugs pointing up.
Wire the footswitch, jacks, and LED
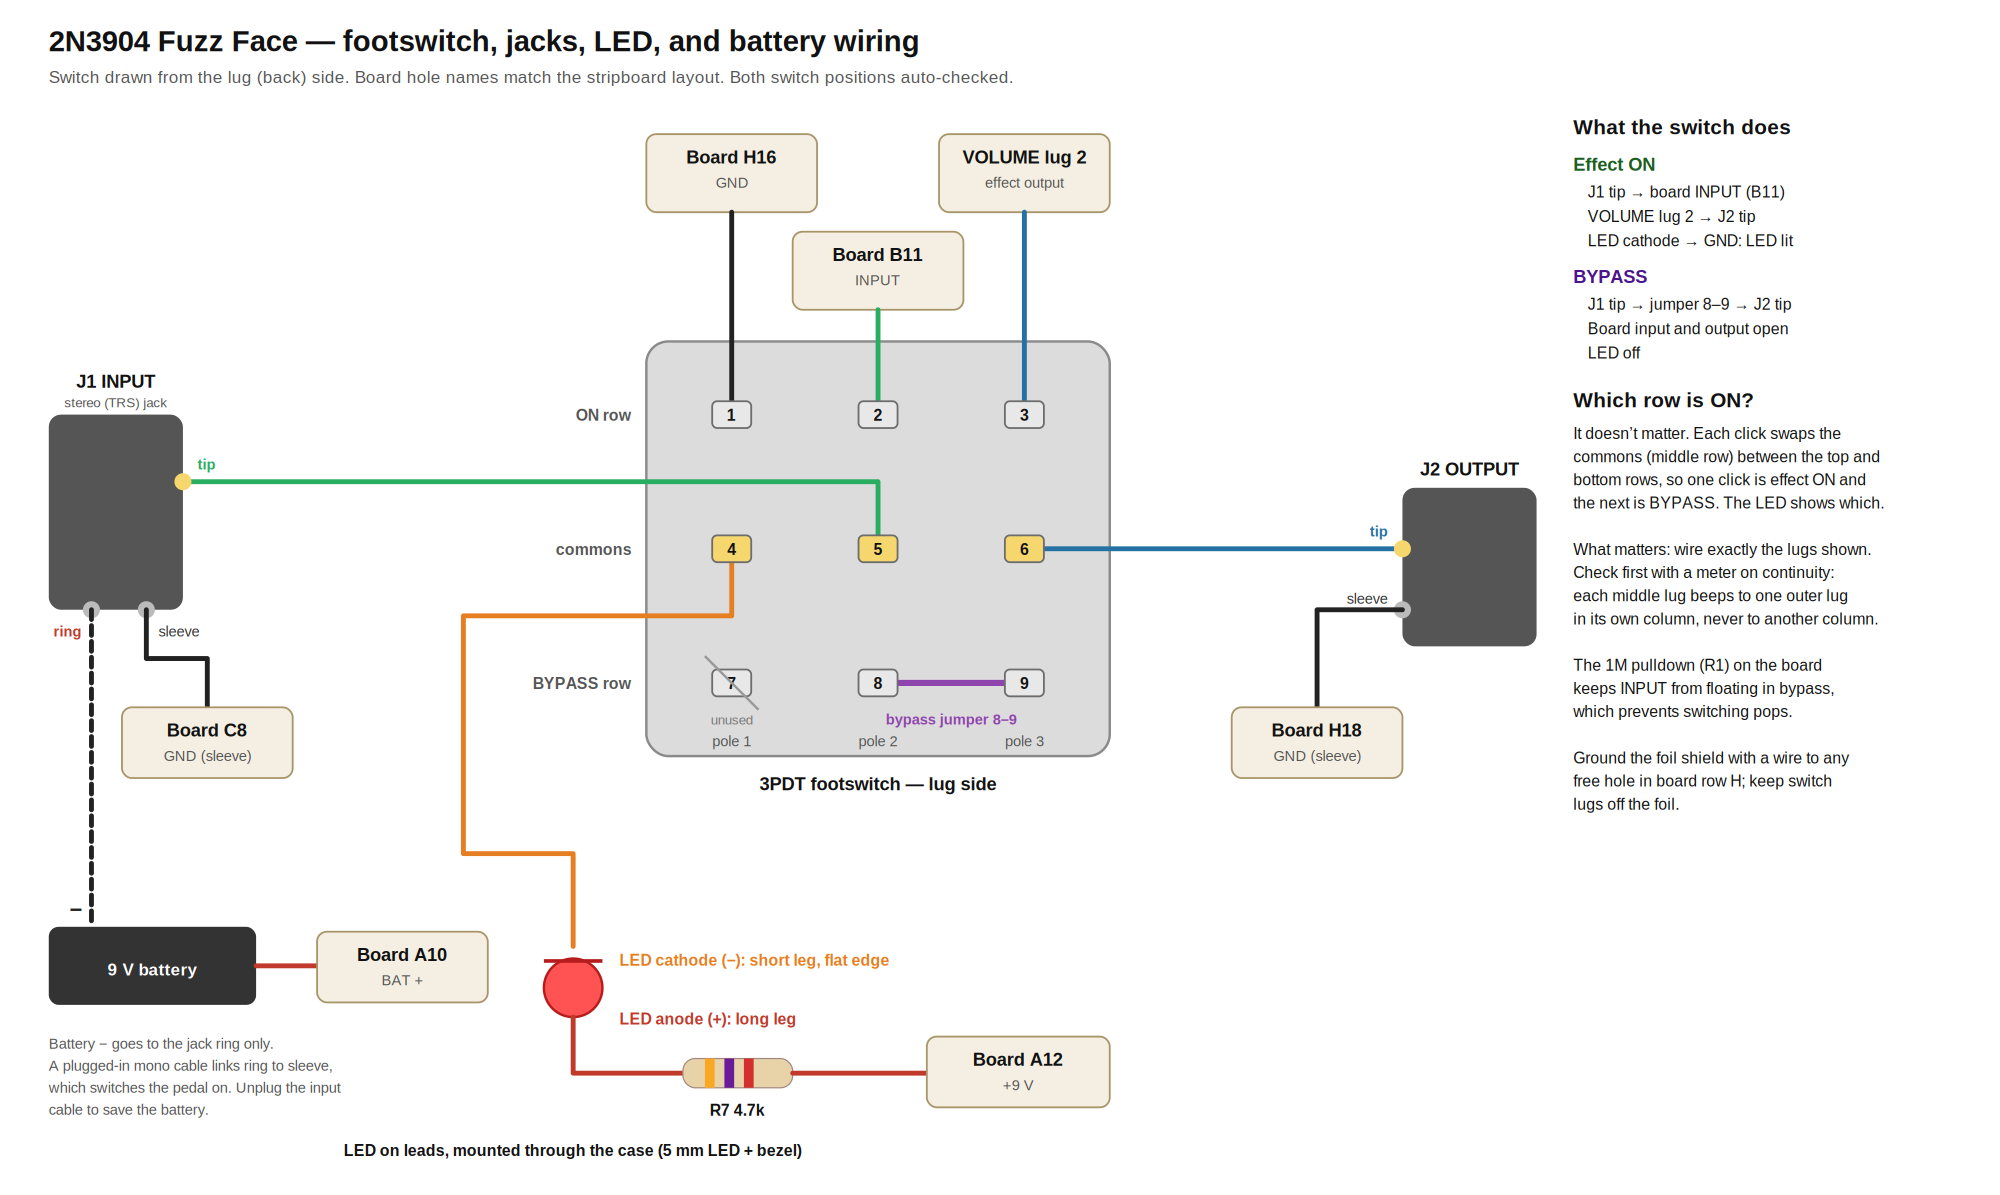
Follow the footswitch wiring diagram. The footswitch connects everything off the board. Select the diagram to open the full-size image.
Check the footswitch
With your meter on continuity, check that each middle-row lug beeps to exactly one outer lug in its own column. Click the switch and check again: it should now beep to the lug at the other end of the same column. Each column is one independent switch.
Wire the footswitch
- Lug 5 (middle) to the input jack tip.
- Lug 6 (middle) to the output jack tip.
- Lug 3 to VOLUME lug 2.
- Lug 8 to lug 9: a short bare jumper. In bypass, this carries your guitar signal straight from the input jack to the output jack.
- Lugs 1 and 2 already have wires from the board. Lug 7 stays empty.
Wire the LED
The LED's longer lead is the anode (+). Solder R7 to it, then solder the wire from pad A12 to the other end of R7. Solder a wire from the LED's short lead (cathode, −) to footswitch lug 4. Cover the joints with heat-shrink tubing.
Wire the battery
Solder the battery snap's red lead to pad A10, if you haven't already. Solder the black lead to the input jack's ring lug, not to the board.
ImportantHow the input jack turns the pedal onA guitar cable's plug connects the input jack's ring and sleeve together. That completes the battery's ground connection, so the pedal only draws power while a cable is plugged into the input. Unplug the input cable when you're done playing.
Verify the build
Before you connect a battery, inspect and test the assembly.
Inspect the copper side
Check every joint. Joints should be shiny and smooth, with no solder bridging two strips. Run a hobby knife along the gaps between strips if you're unsure. Most stripboard faults are a solder bridge or a missed cut.
Check for a short
With no battery connected, measure the resistance between pad A10 (+9 V) and any hole in row H (ground). It must not read close to 0 Ω. If it does, find and fix the short before you go on.
Check the polarized parts
Check that C2's stripe faces row H, that Q1's flat face points left and Q2's points right, and that the LED's short lead goes to footswitch lug 4.
Set the bias
This is where the pedal comes to life. You need a battery, a cable plugged into the input jack, and your multimeter.
Power up
Connect the battery and plug a cable into the input jack. Measure between pad A10 and row H: you should see close to 9 V.
Adjust VR1
Put the black probe on any hole in row H. Put the red probe on strip D, anywhere in columns 11 to 20 (Q2's collector). With no guitar signal, turn VR1 until the meter reads about 4.5 V.
CautionMeasure strip D, not the outputDon't measure strip A in columns 17 to 20. That's the output tap, and it reads close to 9 V whatever the bias is.
Check the other voltages
These are estimates from the design, not measurements. Readings a little different are normal.
- Strip E, columns 1 to 15 (Q1's collector): about 1.4 V (estimated).
- Strip F, columns 1 to 15 (Q2's emitter): about 0.75 V (estimated).
If Q2's collector won't reach 4.5 V at any trimmer setting, check the transistors' direction first.
Test it
Connect your guitar to the input and your amplifier to the output. Start with the amplifier quiet.
- Click the footswitch until the LED is off. You should hear your clean guitar: that's bypass.
- Click again. The LED lights and you should hear the fuzz.
- Turn FUZZ and VOLUME through their full range. Clockwise gives more fuzz and more volume.
Your ChoiceUnderstanding Your Options - Bias by ear4.5 V is a starting point, not a rule. Once everything works, try small adjustments to VR1 while you play. Lower collector voltages tend to sound gated and spitty; higher ones tend to sound smoother. Pick what you like.
Mount it in the case
Once the pedal works on the bench, move it into the case. Some kits include a printed case. If yours didn't, print the case from the K7RHY case files before you start this step.
Shield the case (optional)
Line the inside of the case with foil tape, then ground the foil: solder a short wire to any free hole in row H, and fasten its other end to the foil under one of the jacks' or pots' mounting nuts. Don't rely on the jacks alone: jacks with plastic bodies won't ground the foil by touching it. Shielding reduces hum and radio pickup.
Mount the hardware
Mount the footswitch, both pots, both jacks, and the LED bezel in their holes, and tighten their nuts. The stereo jack is the input. Push the LED into its bezel from the inside.
Insulate and place the board
Put standoffs or insulating tape on the copper side of the board so it can't touch the foil, then fit the board in the case. Place the battery where its terminals can't touch the board or the switch lugs.
CautionKeep bare metal off the foilAny bare lead or solder joint that touches grounded foil causes a short. Check the copper side of the board, the switch lugs, and the jack lugs before you close the case.
Test again
Close the case and repeat the test. If something that worked on the bench stops working, look for a wire that came loose or a joint touching the foil.
Sourcing your own parts
If you'd rather buy the parts yourself, these are the specifications the kit is built to. The hole locations in the assembly steps assume parts with these lead spacings.
| Part | Value | Specification |
|---|---|---|
| Q1, Q2 | 2N3904 | NPN transistor, TO-92 (check the pinout of your part) |
| R1–R3, R5–R7 | See the parts list | Resistors, 1/4 W, metal or carbon film |
| R4 | 100 kΩ | Mini resistor, 1/4 W, body no longer than 3.5 mm (a standard size doesn't fit its diagonal position) |
| VR1 | 50 kΩ | Single-turn trimmer, three pins in a row at 0.1 in (2.54 mm) |
| C1 | 470 nF | Film capacitor, 5 mm lead spacing, 50 V or higher |
| C3 | 10 nF | Film capacitor, 5 mm lead spacing, 50 V or higher |
| C2 | 22 µF | Aluminum electrolytic, radial, 2.5 mm lead spacing, 16 V or higher |
| C4 | 100 nF | Ceramic capacitor, 5 mm lead spacing |
| C5 | 47 pF | Ceramic capacitor, 2.5 mm lead spacing. Optional: fit only if the pedal squeals. |
| FUZZ | B1k | 16 mm potentiometer, linear, solder lugs, 6 mm knurled shaft |
| VOLUME | A500k | 16 mm potentiometer, audio (log), solder lugs, 6 mm knurled shaft |
| SW1 | 3PDT | Latching footswitch, 9 solder lugs |
| LED | 5 mm | Any color, with a panel bezel |
| J1 | 1/4 in | Stereo (TRS) jack, enclosed barrel or open-frame |
| J2 | 1/4 in | Mono jack, enclosed barrel or open-frame |
| Board | 20 × 8 holes | Stripboard, 0.1 in pitch, strips along the 20-hole length |
| Battery snap | 9 V | With leads |
| Knobs | — | Two push-on knobs for 6 mm knurled shafts |
| Wire | 24 AWG | Stranded hookup wire, plus heat-shrink tubing |
Operating Instructions
The Fuzz Face is a two-knob fuzz. FUZZ sets how much gain and saturation you get, and VOLUME sets the output level. The footswitch switches between the effect and a true-bypass path. In bypass, your guitar signal goes straight from the input jack to the output jack without passing through any circuitry. The LED is lit when the effect is on.
The pedal runs on a 9 V battery. It draws power only while a cable is plugged into the input jack, so unplug the input cable when you're not playing.
Fuzz Face circuits are sensitive to what comes before them. They sound and respond best with the guitar plugged straight into the pedal, and they clean up when you turn down your guitar's volume knob.
Troubleshooting
- Bypass works, but there's no sound with the effect on: first check that the guitar is plugged into the input (the stereo jack) and the amplifier into the output. With the cables swapped, bypass still works but the effect is silent. Then work through the diagnostic tests below.
- The LED doesn't light: the LED is probably backwards. Check that its short lead goes to footswitch lug 4.
- Muffled, quiet, and FUZZ barely changes anything: if you installed C5, remove it. Desolder or snip one lead, then play again.
- Squealing, or you can hear a radio station: install C5 (47 pF, D3 to E3). If 47 pF doesn't stop it, try 100 pF, but expect less treble and output.
- Nothing works at all: check the battery, and check that a mono cable is plugged into the input jack.
- Silent with the FUZZ pot disconnected: that's expected. Without the pot, Q2's emitter has no path to ground, so Q2 can't conduct. It doesn't damage anything.
Diagnostic tests
Use these when the pedal works in bypass but not with the effect on. Work through them in order. Each group needs more effort than the one before, and most faults turn up in the first three.
1. Quick checks (no meter)
| Check | Why it matters |
|---|---|
| The guitar goes to the input (stereo) jack, and the amplifier to the output | With the cables swapped, bypass works but the effect is silent. |
| The input cable is mono | The pedal only gets power when a mono plug connects the input jack's ring to its sleeve. A stereo (TRS) cable never turns it on. |
| The LED lights with the effect on | If it does, the battery, R7, and footswitch pole 1 all work. If it doesn't, suspect the power or the footswitch first. |
| Both knobs are at least halfway up | VOLUME at zero gives silence. |
2. Continuity (battery unplugged)
| Test | Expected | If not |
|---|---|---|
| Effect on: input jack tip to pad B11 | Beeps | The footswitch's effect path is broken. |
| Effect on: VOLUME lug 2 to output jack tip | Beeps | Same. |
| Bypass: repeat both tests | Neither beeps | |
| Footswitch only: each middle-row lug to the lugs above and below it | Beeps to one of them, never to a lug beside it | If it beeps sideways, the switch is rotated 90° from the diagram. That fault gives a working bypass and a silent effect. Rotate the switch, or rewire it to match. |
| Each track cut: A4–A6, A15–A17, C15–C17, D9–D11, E15–E17, F15–F17 | No beep | Cut that hole again. |
3. DC voltages (battery in)
Plug a mono cable into the input, with no guitar signal, and turn FUZZ fully clockwise. Put the black probe on any hole in row H. These are estimates from the design, so readings within about 0.2 V of the low values are normal.
| Point | Expected (estimated) | What a wrong reading means |
|---|---|---|
| A10 (+9 V) | 8.5–9.6 V | About 0 V: no power. Check the battery, the snap, the battery − wire to the input jack ring, and the cable (it must be mono). |
| Strip A, columns 1–4 (between R2 and R3) | About 3.8 V | About 9 V: R3 or Q1 isn't conducting. |
| Strip D, columns 1–9 (Q1's base) | About 0.6 V | |
| Strip E, columns 1–15 (Q1's collector, Q2's base) | About 1.4 V | Well above 2 V: Q1 is off, backwards, or its emitter isn't grounded at C6. About 0 V: a short to ground or a solder bridge. |
| Strip F, columns 1–15 (Q2's emitter) | About 0.75 V | About 0 V: Q2 isn't conducting or is backwards, or the F11 wire to FUZZ lug 3 is off. |
| Strip D, columns 11–20 (Q2's collector) | 4.5 V, and turning VR1 moves it from about 7 V down to under 1 V | About 9 V: Q2 isn't conducting. Stuck low: VR1 is set too high. Doesn't move: check VR1, the D18–E18 link, and R6. |
| Strip A, columns 17–20 (output tap) | About 8.3 V | |
| Strip C, columns 17–20 (after C3) | 0 V |
If the voltages point to a transistor, unplug the battery and test it on your meter's diode setting. Red on B and black on E should read about 0.6–0.7 V, and red on B and black on C should read about the same. With the probes swapped, both should read open.
4. Signal trace
If every voltage is right, follow the signal with an audio probe. Plug a spare cable into your amplifier, with the volume low. Clip its sleeve to row H, and put a capacitor of 10 nF to 1 µF in series with its tip so the probe blocks DC. Play a note with the effect on, and touch each point in order:
- Strip B: clean guitar.
- Strip E, columns 1–15: louder, gritty.
- Strip D, columns 11–20: loud fuzz.
- Strip A, columns 17–20: fuzz, a little quieter.
- Strip C, columns 17–20: the same.
- VOLUME lug 2, then footswitch lug 3, then the output jack tip: the same, at the level the VOLUME knob sets.
Where the sound stops, the fault is between that point and the one before it.
Precautions
If you line the case with foil tape for shielding, keep the copper side of the board and the switch lugs from touching the foil. Use standoffs or insulating tape under the board. Ground the foil with a wire to row H, as described in the case-mounting step.
Take the battery out if you store the pedal for a long time.